
Grab the Downloads
By submitting for this free download you will be added to our email newsletter. This offers opportunities to get discounts, free downloads, exclusive offers, industry news, first dibs on new courses and other juicy production goodies. We hate spam and never buy, sell or share email addresses. See our full privacy policy.
What’s up everybody! In this video we’re going to talk about a super powerful mixing technique – BPM syncing your reverbs.
The most advanced producers and engineers in electronic music are doing this, and over the next few minutes, I’m going to show you exactly how.
Here’s our game plan. We’re going cover:
- What BPM syncing is and why you should do it
- How to make the calculations
- What parameters to work with, specifically
- A couple of actual examples of how I use this in one of my tunes
- What tools and plugins I use to get the best results
So, fire up your DAW and let’s do this!
If you’d like to follow along to the video or want to read a bit more into things, here’s the entire transcript for ya:
BPM Syncing: What is it and Why DO IT?
BPM syncing, put simply, is getting a parameter to respond rhythmically with your song. If you’ve worked with delays at all before then you’re probably already familiar with it. If you load up a Simple Delay, you’ll see it syncs by default to the song BPM. If we set it at 4, then it’s a quarter note delay.
But if we look at other devices, like the Reverb, or the Compressor, you don’t get that option. You only see a value in milliseconds. This doesn’t mean we can’t do the same thing as the delay though; we just need to manually make the calculations.
So that begs the question, why would we go to the trouble of making those calculations? What’s the advantage? Well, this might seem obvious, but in case it’s not, it gets the reflections and tails of your reverbs to groove and quantize to your song. The ambiance and room sound will now lock to your song’s tempo and move in time rather than being some random value you set by ear.
The main pluses I get from it are:
- Being able to add a lush sense of space to my mix without washing things out
- Adding clarity and separation in my drums and other elements I want to feel really close to me in the mix – like bass or a lead vocal.
Let’s listen to a quick clip of a song with this reverb technique implemented. This is a remake I’m doing of Ain’t No Sunshine When She’s Gone. I’ll just play the drop for ya.
How to Make the Calculations
Now let’s talk about how to make the calculations. I’m going to show you 3 ways real quick here.
Method 1: Bust Out the Calculator:
Here’s the formula. There are 60,000 ms per minute, so you take 60,000 then divide that by your song BPM, 70 in the case of my tune here, that gives you the value, in milliseconds, of 1 beat. This song’s in 4/4 time, so that’s a quarter note.
Let’s try it. 60,000 ms per minute, divided by 70 BPM = 857 ms per quarter note.
All you do then to get other values is multiply or divide it further. If we want an eighth note, we just divide that by 2 and get 429 ms. K? You get it. This way is a bit slow and painful, but hey, at least you can get some extra mileage out of that calculator from grade school!
Method 2: The App
There’s a free iOS app called AudiofileCalc made by AudioFile Engineering. Grab that and it’ll make all the calculations for you. It does a whole bunch of other useful things that I won’t get into now, but it does BPM timings like a charm. Check it out.
Let’s run through an example. You go to Note Length, type in your song BPM, and then choose the length of note you want. We’ll use a quarter note. And presto! It shows the value in milliseconds. Unfortunately, there are some limitations: 1/32 note is the shortest you can go and Double Whole is the longest. I prefer to go down to a 1/128th note and a full 8 bar phrase. And that’s why we have method #3.
Method 3: The Spreadsheet
My first job out of University was as an auditor. I never would have thought in a million years that THAT job and my music career would ever have anything in common, but here we are inside a spreadsheet. Who knew!
I’m obsessed with systems and efficiency, and I use BPM synced timings so much as an engineer that it made sense to have something do it for me instantly. I built this spreadsheet, which I’ve shared with you in the links, and it does all the heavy lifting. You just type in your song BPM up top, and it instantly calculates everything from 8 bars down to a 128th note.
It’s in the OSX program Numbers, but I also exported an Excel version for Windows users. Hit up the link, download it, and it’s yours.
What Parameters to Work With
So what specific parameters do I use this with in reverbs? Pre-delay and decay time.
Pre-delay
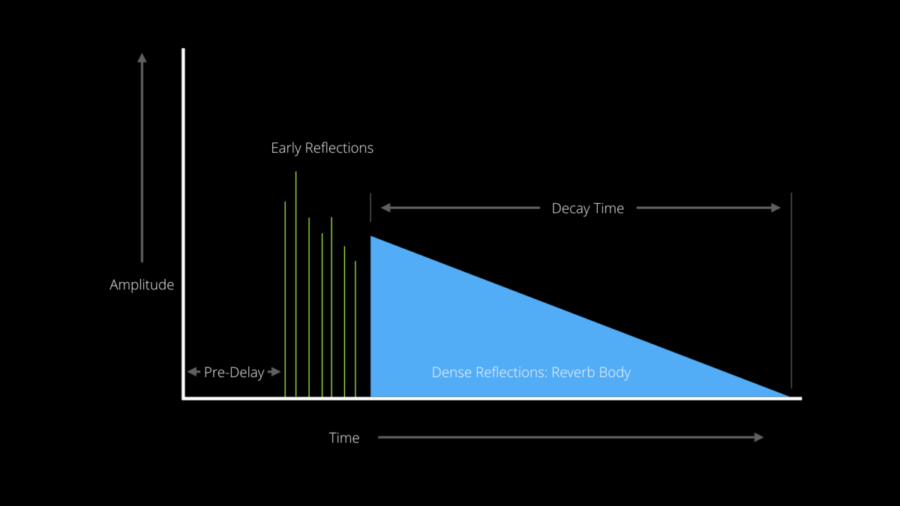
Pre-delay is one of the sweetest and most powerful tools you can use in your reverb. When you experience sound in a real room, what you hear first is the early, direct reflections off of nearby surfaces. Then you hear the more diffuse secondary reflections that all blend together into the reverb tail. In my graphic, you can see the green early reflections and then the blue reverb body, or tail.

Pre-delay is the time, in milliseconds (ms) between the original dry sound and the first early reflections. Pre-delay is an essential part of how we perceive both the size of the room and our distance from the source sound. Using pre-delay on a reverb can bring a sound closer to us in the mix, while still giving a nice sense of ambiance. This makes it perfect for percussion and sounds that we want right in our face in an electronic mix.
Now some of you may have heard people say not to put reverb on bass, so let me explain what I mean. You generally don’t want reverb on your sub. But it’s common in electronic music engineering to split your bass into multiple bands. I like the sound of a very short, tight reverb on the mid and high bands of my bass, especially for basses with a lot of harmonic information in some genres. In this case, a reverb with pre-delay helps the bass to feel close to you, while still giving it a sense of space.
Decay time
The other parameter I use BPM syncing on is the decay time. This is the time it takes for the reverb tail to fully decay. More specifically it’s what’s called the RT60 time of the reverb, or the amount of time it takes to reduce in amplitude by 60 decibels.
Let’s take a look at a couple of examples in this song I’m working on.
Examples in Action
Intro drum loop
There’s a chopped up drum loop in the intro here. Let’s solo it up. Here it is with the reverb…and without the reverb.
I’ve got a drum room style reverb on the loop using BPM synced timings. Let’s take a look at them.
-Pre-delay: 54 ms (1/64th note). You can see it if we bring up the spreadsheet here.
-Decay Time: 375 ms (1/8 note, net of pre-delay). You’ll notice that’s shorter than a regular 1/8th note in my spreadsheet and that’s because we’re using pre-delay. Pre-delay adds to the decay time by shifting back the entire signal. You can see here where I’ve rendered out a couple of reverbs to audio. The first one has no pre-delay. The second one does. You can see the entire signal takes longer to decay. When I’m engineering sounds, I want to know exactly when they’re fully decayed, so I subtract any pre-delay. In my spreadsheet, that’s why I have the second column here called “Net Of Pre-Delay”. So in this case, a regular 1/8th note would be 429 ms, but with a 54 ms pre-delay subtracted off, we get a decay time of 375 ms. Clear as mud? Just trust the spreadsheet and you’ll be all good.
Main L & R claps
Another way I’ve used BPM synced reverb is on the main claps in the drop. I’m using a Drum Rack for the beats, and I have a main snare punching up the center in mono, then 2 separate claps hard panned left and right to add stereo width. My goal with the reverb is to add a big room sound that decays perfectly before the next time the claps hit, while not cluttering up the center of the mix where the snare and kick need to dominate.
Let’s solo up the Drum Rack and listen with the reverb…and without the reverb.
So let’s take a look at the settings. We’ve got the reverb placed in a send and return setup inside the Drum Rack, and we’re sending up signal from each of the hard panned claps. We’re using the filters to bandpass the signal and help it blend into the mix, as well as some extra stereo spreading. The Pre-Delay is 107 ms, (1/32 note). The claps are on beats 2 and 4 of each bar, with 2 beats in between them, so I set the decay at 1607 ms, which is a 1/2 note minus the pre-delay).
Let’s listen to that one more time.
Guitar Chops
The final example I wanted to share with you is on this chopped up guitar. Let’s solo it up and listen with the reverb…and without the reverb.
For settings, we’ve got a pre-delay of 27 ms which is a 128th note. Because of the playing style and the chops, using a longer pre-delay created too much separation and the reverb sounded audibly disconnected from the source sound, so I like the 128th note here. For a decay, we’re using 402 ms, which is an 1/8th note, minus the pre-delay. We’re also using our input filters to bandpass the sound and some low and high shelving in diffusion network to help tame up the reverb so it’s more transparent in the mix.
Here’s everything all together.
Alright. There you have it! BPM synced timings and reverb. Add that one to your toolbox and test it out in your next track.
I hope it inspired you to go write some music. Happy producing everyone!
Catch ya next time!